1: The plate
The plate itself consist in a plexiglass sized a little bit more than A4. It is not the lightest solution but I like the hard surface to draw on. The base-map consist in a gray-scale print. On the base-map there are contours 1m as clearings both extracted from laser data. The base-map should be readable but kind of disappear when the field-notes are drawn. I always place a set of symbols on the base-map, making it easier to me to draw them the right size right away. Also a mesh I add to facilitate the import of the field-notes into the OCAD (Some more details here). The base-map is taped on the plate with simple transparent tape. As for the film I started to work with the common (Ritfilm 50micron A4) replacing the one propagated in Switzerland (adhesive). The common is six times cheaper, has no real disadvantages but some advantages: You get it everywhere, the base-map disappears better while drawing and scanning and after removing it from the base-plate, you get it in a form practical to store. The film I tape on the plate with the same common transparent tape.
2: Noise reduction
I believe the big czechs use a kind of curtain to curtail the field one actually works with on the map. I tried out two stripes of paper with transparent tape lapping over a few millimeters. That way I can relocate them on demand.
3: Old map
For this job I had a pretty good old map to work with. So I took with me. Colorprint on paper in a swedish style plastficka.Same scale as the base map (here 1:3500)
4: Daněks sophisticated pencil holder
Using Jiřís pencil holder for the first project, it got quickly obvious that this one is no prototype but the result of a longer development. It is fun to work with it and it definitively enhanced my drawing style and discipline enabling me to switch colors so easily.
5: Pencils and last nail
I am drawing with a set of 0.5mm pencils (red, green, blue, lead 2H and yellow). In addition I recently added two pencils 0.7mm to the set (purple and pink) which I use for the construction. The latter are from the Pilot Color ENO series. The colors are unobtrusive and as an !!advantage!! they fade, when exposed to light.
As what I call the last nail I also have a permanent marker with me. After erasing the drawing film it gets glossy and the pencils work only halfway, so after I am decided I use the last nail (Stabilo OH Pen universal red) to pronounce my final decision.
As for the color set I apply I don't have a permanent one, but I try to follow the thumb rule that the field notes should reach for maximum readability. Too dark or too light colors I try to minimze, so it is red I prefer for the most dominant features.
6: Rubber pen
I also added a rubber pen (Läufer Florett) to my set. In accordance with its name (rapier) I works fine for precise erasure.
7: Extra leads
Well. You don't want to end up in the middle of a forest without your main colors. I did once. That is enough. I got now a tube with replacement leads for all colors as an inherent part of my pencil holder.
:-( : Compass
Working with laser data I do not use the compass all the time. So I got it in my jacket, respectively had it in my jacket. I must have lost it in the forest. Maybe I should fix it to the pencil holder?
8: Backpack with: Food, drink & clothes
...
Posts mit dem Label uaul grond werden angezeigt. Alle Posts anzeigen
Donnerstag, 2. Mai 2013
Donnerstag, 25. April 2013
Mappers Blog: 170 hours per square kilometer
Today I was engaged with the pretty much trickiest mapping I have done so far. Still in the Uaul Grond, a slope full of rocks big as buildings. Buildings? The laser data I am working with (DTM Grid 2m = SwissAlti3d) all buildings and lookalikes are removed. This means back to good old mapping to me and an impression of the job Marian Cortita did for the WOC 2010. As said in the title my mapping speed sank to a 170 hours per square kilometer today. Checking fig.1 and 2 you might get an idea why...
fig.1. Map and base
fig.2. The same with some intresting spots marked yellow.
fig.1. Map and base
fig.2. The same with some intresting spots marked yellow.
Montag, 22. April 2013
Mappers Blog: Bad Day in the forest

fig.1. Well actually even mappers have bad days sometimes. Left: My usual mapping. Right: My bad day mapping. :-P
Today I continued mapping my part of the Uaul Grond (Uaul la crusch)after a weeks break (in sunny Tessin). But I turned out to be a bad day today.
Bad Day
- 15cm new soaking wet snow->wet shoes->cold feets for hours
- Thought, I stored the refill leads in Flims ->wrong-> bought and tried out another pen-> not permanent -> ran out of my main colors -> had to switch the color scheme
- Also bought a new eraser -> worked fine -> but destroyed the films surface -> area not rewritable anymore
- The old map is not very good in this area (missing HUGE rocks 30x10x15m)
- The laser also helped less than usual ->step slopes -> additionally Swisstopos "automatic building removal"-algorithm -> removing half of these contless huge rock-hills from my base map
- Areas with fallen trees from the summer 2011 storm
- 0.095km2 in 7h40
Mittwoch, 3. April 2013
Mappers Blog: Base for mapping Uaul Grond
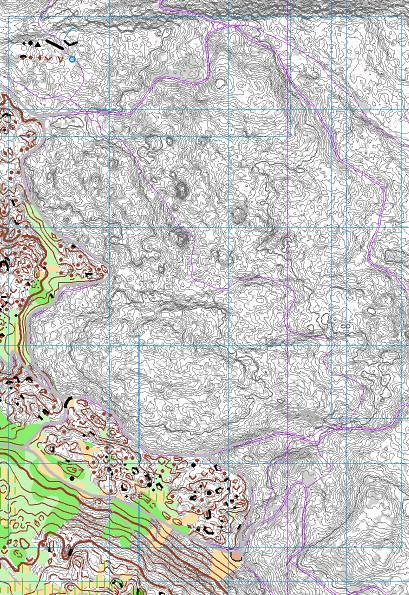
I am leaving for Switzerland for some weeks. The Hemfosa project will rest until the snow has melted away. Instead I will be mapping a part of the Uaul Grond, by the way my favorite part of my favorite forest (Uaul la Teua and Uaul la Crusch). Here I share a sample of my base map with you.
fig.1. Basemap for mapping Uaul la Teua
Some details:
fig.1. Basemap for mapping Uaul la Teua
Some details:
- The base map itself bases on Laserdata, offical measurement data (violet), older maps and actual maps alongside.
- As the terrain is very detailed I am mapping 1:3500 for a 1:10K map to get some space for clean drawing. The less detailed part I map in 1:5K as usual. I try to keep the base map as decent as possible, so I print it out in grey-scale.
- As the terrain is complex the contourlines are provided with slopelines. Equidistance is 1m.
- The vegetation information (available from OCAD11, alt. Karttapullautin) I reduced to this grey surfaces in the background (grey means: No high or intermediate trees).
- Some size-reference objects in the upper left corner
- the blue mesh for referencing the field notes
- the other blue lines to organize the overlap of the different sheets
- violet: data from official measurents, but the laser data is expected to be more precise
- the bordering track of the existing map in the lower left corner is set to grey in case it has to be adapted
- Additionally I will carry with me a print of the map from 2000 mapped by Gian-Reto Schaad, Urs Steiner and Beat Imhof. I guess I can always learn from them.
Samstag, 30. März 2013
Mappers Blog: Jiří Daněk 8-color-scheme for his field notes
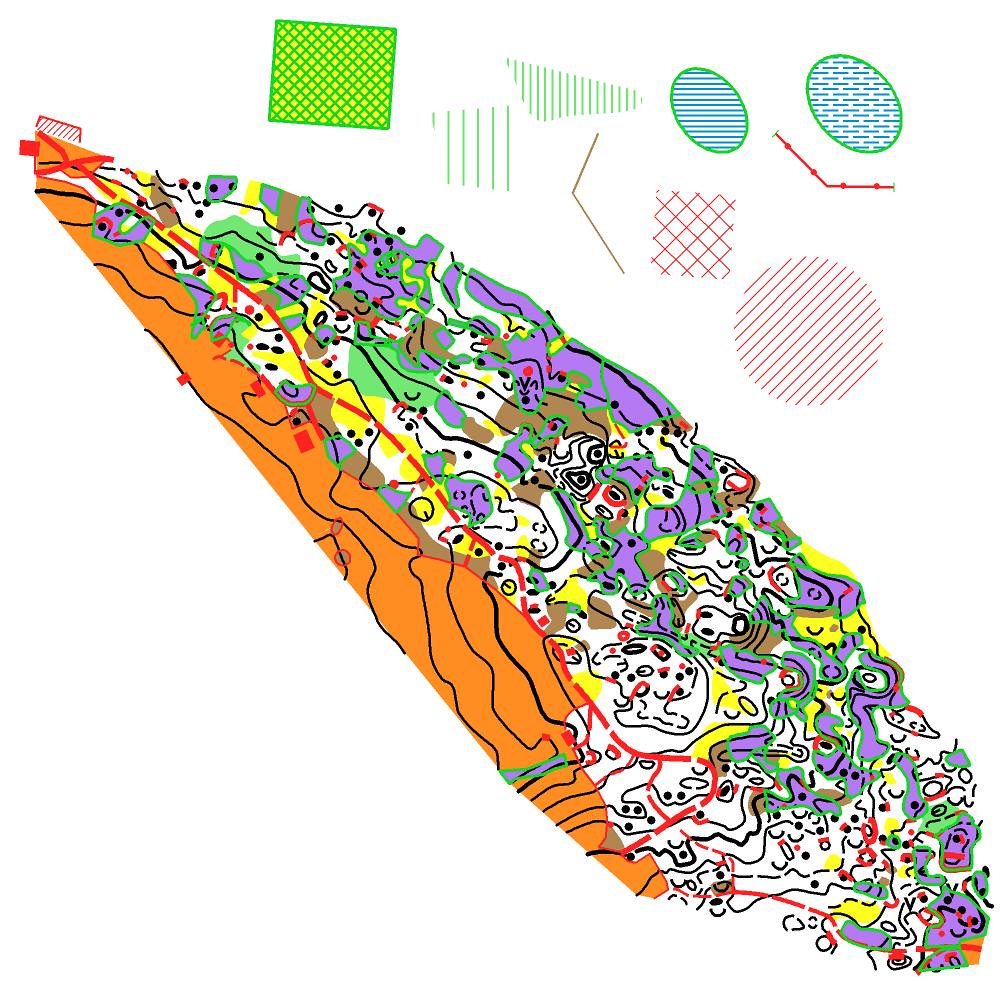
As I am collecting field notes from as many different mappers as possible (send me yours (incl. map name, 10x10cm original size field note, corresponding map clip, map name, as comments to your drawing philosphy; mlerjen@ubol.ch) and on the same time I am preparing for something, I thought I would do in about 10 years (Mapping the heart of Uaul Grond!; most eastern part on the map) Jiří Daněk shared to me the 8-color-scheme he follows to make his field notes.
To get a visual idea how his color scheme would turn out at the Uaul Grond map I downloaded Swiss Orienteerings ISOM2000 1:10K Reference file and modified it according to Jiřís scheme. If you want to try it just download this ISOM2000 1:10K Reference File (Fieldnote, Colors& Symbols J.Daněk) (OCAD9), then open a OCAD map similar to the map you are going to map and then load colors and symbols from the file just downloaded (OCAD10>Karte>Farben und Symbole laden von); if you get to many error messages it could be about time to clean up ;-)).
For the Uaul Grond project, I tried this out with that part I mapped for the Swiss O Week 2011 Training Map Crestasee which is acutally bordering the current project.
fig.1. Part of the map Crestasee according to ISOM2000.
fig. 2. Same map visualized with the field note set according to Jiří Daněk. Additionally he uses very thin green and purple for the construction. Blue characters to qualify roads and tracks. If the terrain is very rocky he also uses two colors for the rocks (passable and not passable).
fig.3. Sample of Jiří Daněks field notes from Vastanaberget, Skåne, Sweden, Year 2000.
What do you think? How would your field notes look like? I invite you to translate your own field note symbol set in the similar way as I did and send it to me. I will publish it.
To get a visual idea how his color scheme would turn out at the Uaul Grond map I downloaded Swiss Orienteerings ISOM2000 1:10K Reference file and modified it according to Jiřís scheme. If you want to try it just download this ISOM2000 1:10K Reference File (Fieldnote, Colors& Symbols J.Daněk) (OCAD9), then open a OCAD map similar to the map you are going to map and then load colors and symbols from the file just downloaded (OCAD10>Karte>Farben und Symbole laden von); if you get to many error messages it could be about time to clean up ;-)).
For the Uaul Grond project, I tried this out with that part I mapped for the Swiss O Week 2011 Training Map Crestasee which is acutally bordering the current project.
fig.1. Part of the map Crestasee according to ISOM2000.
fig.3. Sample of Jiří Daněks field notes from Vastanaberget, Skåne, Sweden, Year 2000.
What do you think? How would your field notes look like? I invite you to translate your own field note symbol set in the similar way as I did and send it to me. I will publish it.
Abonnieren
Posts (Atom)
o-zeugs over and out (late wc china finding)
Yes. Let the o-zeugs blog rest in peace. I´ll take it down eventually. And yes, I stumbled over the decisions of the Ethics Panel regarding ...
-
I here describe the way of the couch-mapper or with other words how far you can get with a swedish .las file (and karttapullautin , OL Lase...
-
Yes. Let the o-zeugs blog rest in peace. I´ll take it down eventually. And yes, I stumbled over the decisions of the Ethics Panel regarding ...